
Introduction
Following the introduction to the notions of BLoC, Reactive Programming and Streams, I made some time ago, I though it might be interesting to share with you some patterns I regularly use and personally find very useful (at least to me). These patterns make me save a tremendous amount of time in my developments and also make my code much easier to read and debug.
The topics I am going to talk are:
Allows to respond to State transition, based on Event.
Allows to control the behavior of a Form based on entries and validation(s).
(The solution I explain also covers the comparison of the password and retyped password).Allows a Widget to adapt its behavior based on its presence in a list.
The complete source code is available on GitHub.
1. BLoC Provider and InheritedWidget
I take the opportunity of this article to introduce another version of my BlocProvider, which now relies on an InheritedWidget.
The advantage of using an InheritedWidget is that we gain in performance.
Let me explain...
1.1. Previous Implementation
My previous version of the BlocProvider was implemented as a regular StatefulWidget, as follows:1.2. New Implementation
The new implementation relies on a StatefulWidget, combined with an InheritedWidget:The advantage is this solution is performance.
Thanks to the use of an InheritedWidget, it may now call the context.getElementForInheritedWidgetOfExactType() function, which is a O(1), meaning that the retrieval of the ancestor is immediate.
This comes from the fact that all InheritedWidgets are memorized by the Framework.
1.3. How to use the new BlocProvider ?
Widget build(BuildContext context){
  return BlocProvider<MyBloc>{
      blocBuilder: () => myBloc,
      child: ...
  };
}
1.3.2. Retrieval of the BLoC
Widget build(BuildContext context){
  MyBloc? myBloc = BlocProvider.of<MyBloc>(context);
  ...
}
--
2. Where to initialize a BLoC
To answer this question, you need to figure out the scope of its use.
2.1. Available everywhere in the Application
Suppose that you have to deal with some mechanisms related to User Authentication/Profile, User Preferences, Shopping Basket... anything that would require a BLoC to be available from potentially any possible parts of an application (eg from different pages), there exists 2 ways of making this BLoC accessible.
2.1.1. Use of a Global Singleton
This solution relies on the use of a Global object, instantiated once for all, not part of any Widget tree.To use this BLoC, you simply need to import the class and directly invoke its methods as follows:
import 'global_bloc.dart';
class MyWidget extends StatelessWidget {
Widget build(BuildContext context){
globalBloc.push('building MyWidget');
return Container();
}
}
This is an acceptable solution if you need to have a BLoC which is unique and needs to be accessible from anywhere inside the application.
- it is very easy to use;
- it does not depend on any BuildContext;
- no need to look for the BLoC via any BlocProvider and,
- in order to release its resources, simply make sure to implement the application as a StatefulWidget and invoke the globalBloc.dispose() inside the overridden dispose() method of the application Widget.
Many purists are against this solution. I don't know really why but... so let's look at another one...
2.1.2. Position it on top of everything
In Flutter, the ancestor of all pages must itself be the parent of the MaterialApp. This is due to the fact that a page (or Route) is wrapped in an OverlayEntry, child of a common Stack for all pages.
Therefore, if you need a BLoC to be available anywhere in the application, you have to put it as the parent of the MaterialApp, as follows:In other words, each page has a Buildcontext which is independent of any other page. This explains why, without using any tricks, it is impossible for 2 pages (Routes) to have anything in common.
2.2. Available to a sub-tree
Most of the time, you might need to use a BLoC in some specific parts of the application.
As an example, we could think of a discussion thread where the BLoC will be used to
- interact with the Server to retrieve, add, update posts
- list the threads to be displayed in a certain page
- ...
For this example, you do not need this BLoC to be available to the whole application but to some Widgets, part of a tree.
A first solution could be to inject the BLoC as the root of the Widgets tree, as follows:
This way, all widgets will access the BLoC, via a call to the BlocProvider.of method.
2.3. Available to only one Widget
This relates to cases where a BLoC would only be used by only one Widget.
In this case, it is acceptable to instantiate the BLoC inside the Widget.
3. Event State
Sometimes, handling a series of activities which might be sequential or parallel, long or short, synchronous or asynchronous and which could also lead to various results, can become extremely hard to program. You might also require to update the display along with the progress or depending on the states.
This first use case is aimed at making it easier to handle such situation.
This solution is based on the following principle:
- an event is emitted;
- this event triggers some action which leads to one or several states;
- each of these states could in turn emit other events or lead to another state;
- these events would then trigger other action(s), based on the active state;
- and so on...
In order to illustrate this concept, let's take 2 common examples:
Application initialization
Suppose that you need to run a series of actions to initialize an application. Actions might be linked to interactions with a server (eg to load some data).
During this initialization process, you might need to display a progress bar together with a series of images to make the user wait.Authentication
At start up, an application might require a user to authenticate or to register.
Once the user is authenticated, the user is redirected to the main page of the application. Then, if the user signs out, he is redirected to the authentication page.
In order to be able to handle all possible cases, sequence of events but also if we consider that events could be triggered anywhere in the application, this might become quite hard to manage.
This is where the BlocEventState, combined with a BlocEventStateBuilder, can help a lot...
3.1. BlocEventState
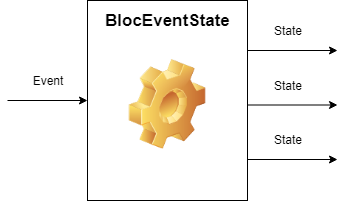
The idea behind the BlocEventState is to define a BLoC that:
- accepts Events as input;
- invokes an eventHandler when a new event is emitted;
- the eventHandler is reponsible for taking appropriate actions based on the event and emitting State(s) in response.
The following picture shows the idea:
Here is the source code of such class. Explanation will follow:
As you can see, this is an abstract class that needs to be extended, to define the behavior of the eventHandler method.
It exposes:
- a Sink (emitEvent) to push an Event;
- a Stream (state) to listen to emitted State(s).
At initialization time (see Constructor):
- an initialState needs to be provided;
- it creates a StreamSubscription to listen to incoming Events to
- dispatch them to the eventHandler
- to emit resulting state(s).
3.2. Specialized BlocEventState
The template to use to implement such BlocEventState is given here below. Right after, we will implement real ones.
Do not worry if this template does not compile... This is normal as we haven't defined the BlocState.notInitialized() yet... This will come in a few moment.
This template simply provides an initialState at initialization and overrides the eventHandler.
There is something very interesting to note, here. We use the asynchronous generator: async* and the yield statement.
Marking a function with the async* modifier, identifies the function as an asynchronous generator:
Each time the yield statement is called, it adds the result of the expression that follows the yield to the output Stream.
This is particularly useful if we need to emit a sequence of States, resulting from a series of actions (we will see later, in practice)
For additional details on asynchronous generators, please follow this link.
3.3. BlocEvent and BlocState
As you have noticed, we have defined a BlocEvent and BlocState abstract classes.
These classes need to be extended with the specialized events and states you want to emit.
3.4. BlocEventStateBuilder Widget
Last piece of this pattern is the BlocEventStateBuilder Widget which allows you to respond to the State(s), emitted by the BlocEventState.
Here is its source code:
This Widget is nothing else but a specialized StreamBuilder, which will invoke the builder input argument each time a new BlocState will be emitted.
Okay. Now that we have all the pieces, it is time to show what we can do with them...
3.5. Case 1: Application Initialization
This first example illustrates the case where you need your application to perform some tasks at start time.
A common use is a game which initially displays a splash screen (animated or not) while it gets some files from the server, checks if new updates are available, tries to connect to any game center... before displaying the actual main screen. In order not to give the feeling that the application does nothing, it might display a progress bar and show some pictures at regular interval, while it does all its initialization process.
The implementation I am going to show you is very simple. It will only display some competion percentages on the screen, but this can be very easily extended to your needs.
The first thing to do is to define the events and states...
3.5.1. ApplicationInitializationEvent
For this example, I will only consider 2 events:
- start: this event will trigger the initialization process;
- stop: the event could be used to force the initialization process to stop.
Here is the definition:
3.5.2. ApplicationInitializationState
This class will provide the information related to the initialization process.
For this example, I will consider:
- 2 flags:
- isInitialized to indicate whether the initialization is complete
- isInitializing to know whether we are in the middle of the initialization process
- the progress completion ratio
Here is its source code:
3.5.3. ApplicationInitializationBloc
This BLoC is responsible for the handling the initialization process based on events.
Here is the code:
Some explanation:
- when the event "ApplicationInitializationEventType.start" is received, it starts counting from 0 to 100 (step 10) and, for each of the values (0, 10, 20, ...) it emits (via the yield) a new state that tells that the initialization is running (isInitializing = true) and its progress value.
- when the event "ApplicationInitializationEventType.stop" is received, it considers that the initialization is complete.
- as you can see, I put some delay in the counter loop. This shows you how you could use any Future (e.g. case where you would need to contact the server)
3.5.4. Wrapping it all together
Now, the remaining part is to display the pseudo Splash screen that shows the counter...
Explanation:
- As the ApplicationInitializationBloc does not need to be used anywhere in the application, we can initialize it in a StatefulWidget;
- We directly emit the ApplicationInitializationEventType.start event to trigger the eventHandler
- Each time an ApplicationInitializationState is emitted, we update the text
- When the initialization is complete, we redirect the user to the Home page.
Trick
As we cannot directly redirect to the Home page, inside the builder, we use the WidgetsBinding.instance.addPostFrameCallback() method to request Flutter to execute a method as soon as the rendering is complete
3.6. Case 2: Application Authentication and Sign out
For this example, I will consider the following use-case:
- at start up, if the user is not authenticated, the Authentication/Registration page is automatically displayed;
- during the user authentication, a CircularProgressIndicator is displayed;
- once authenticated, the user is redirected to the Home page;
- anywhere in the application, the user has the possibility to log out;
- when the user logs out, the user is automatically redirected to the Authentication page.
Of course, it is very possible to handle all this programmatically but it is much easier to delegate all this to a BLoC.
The following diagram explains the solution I am going to explain:

An intermediate page, called "DecisionPage" will be responsible for the automatic redirection of the user to either the Authentication page or to the Home page, depending on the status of the user authentication. This DecisionPage is of course, never displayed and should not be considered as a page, as such.
The first thing to do is to define the events and states...
3.6.1. AuthenticationEvent
For this example, I will only consider 2 events:
- login: this event is emitted when the user correctly authenticates;
- logout: the event is emitted when the user logs out.
Here is the definition:
3.6.2. AuthenticationState
This class will provide the information related to the authentication process.
For this example, I will consider:
- 3 flags:
- isAuthenticated to indicate whether the authentication is complete
- isAuthenticating to know whether we are in the middle of the authentication process
- hasFailed to indicate that the authentication failed
- the name of the user once authenticated
Here is its source code:
3.5.3. AuthenticationBloc
This BLoC is responsible for the handling the authentication process based on events.
Here is the code:
Some explanation:
- when the event "AuthenticationEventLogin" is received, it emits (via the yield) a new state that tells that the authentication is running (isAuthenticating = true).
- it then runs the authentication and, once done, emits another state that tells that the authentication is complete.
- when the event "AuthenticationEventLogout" is received, it emis a new state that tells that the user is no longer authenticated.
3.5.4. AuthenticationPage
As you are going to see, this page is very basic and does not do very much, for sake of explanation.
Here is the code. Explanation will follow:
Explanation:
- line #11: the page retrieves the reference to the AuthenticationBloc
- lines #24-70: it listens to emitted AuthenticationState:
- if the authentication is in progress, it displays a CircularProgressIndicator that tells the user that something is going on and prevents the user from accessing to the page (lines #25-27)
- if the authentication is successful, we do not need to display anything (lines #29-31).
- if the user is not authenticated, it displays 2 buttons to simulate a successful authentication and a failure.
- when we click on one of these buttons, we emit an AuthenticationEventLogin event, together with some parameters (which normally will be used by the authentication process)
- if the authentication failed, we display an error message (lines #60-64)
That's it! Nothing else needs to be done... Easy isn't it?
Tip
As you may have noticed, I wrapped the page inside a WillPopScope.
The rationale is that I do not want the user to be able to use the Android 'Back' button as in this sample, the Authentication is a compulsory step which prevents the user from accessing any other part unless correctly authenticated.
3.5.5. DecisionPage
As said previously, I want the application to automate the redirection to the AuthenticationPage or to the HomePage, based on the authentication status.
Here is the code of this DecisionPage, explanation will follow:
Reminder
To explain this in details, we need to come back to the way Pages (=Route) are handled by Flutter. To handle Routes, we use a Navigator, which creates an Overlay.
This Overlay is a Stack of OverlayEntry, each of them containing a Page.
When we are pushing, popping, replacing a page, via the Navigator.of(context), the latter updates its Overlay (so the Stack), which is rebuilt.
When the Stack is rebuilt, each OverlayEntry (thus its content) is also rebuilt.
As a consequence, all pages that remain are rebuilt when we are doing an operation via the Navigator.of(context) !
So, why did I implement this as a StatefulWidget?
In order to be able to respond to any change of AuthenticationState, this "page" needs to remain present during the whole lifecycle of the application.
This means that, based on the reminder here above, this page will be rebuilt each time an action is done by the Navigator.of(context).
As a consequence, its BlocEventStateBuilder will also rebuild, invoking its own builder method.
Because this builder is reponsible for redirecting the user to the page that corresponds to the AuthenticationState, if we redirect the user each time the page is rebuilt, it will continue redirecting forever since continously rebuilt.
To prevent this from happening, we simply need to memorize the last AuthenticationState for which we took an action and only take another action when a different AuthenticationState is received.
How does this work?
As said, the BlocEventStateBuilder invokes its builder each time an AuthenticationState is emitted.
Based on the state flags (isAuthenticated), we know to which page we need to redirect the user.
Trick
As we cannot directly redirect to another page from the builder, we use the WidgetsBinding.instance.addPostFrameCallback() method to request Flutter to execute a method as soon as the rendering is complete
Also, as we need to remove any existing page before redirecting the user, except this DecisionPage, which needs to remain in all circumstances, we use the Navigator.of(context).pushAndRemoveUntil(...) to achieve this.
3.5.8. Log out
To let the user logging out, you may now create a "LogOutButton" and put it anywhere in the application.
This button simply needs to emit a AuthenticationEventLogout() event, which will lead to the following automatic chain of actions:
- it will be handled by the AuthenticationBloc
- which in turn will emit an AuthentiationState (isAuthenticated = false)
- which will be handled by the DecisionPage via the BlocEventStateBuilder
- which will redirect the user to the AuthenticationPage
Here is the code of such button:
3.5.7. AuthenticationBloc
As the AuthenticationBloc needs to be available to any page of this application, we will also inject it as a parent of the MaterialApp, as follows:
4. Form Validation
Another interesting use of a BLoC is when you need to validate a Form and:
- validate the entry related to a TextField against some business rules;
- display validation error messages depending on rules;
- automate the accessibility of Widgets, based on business rules.
The example I am now going to take is a RegistrationForm which is made up of 3 TextFields (email, password, confirm password) and 1 ElevatedButton to launch the registration process.
The business rules I want to implement are:
- the email needs to be a valid email address. If not a message needs to be displayed.
- the password needs to be valid (must contain at least 8 characters, with 1 uppercase, 1 lowercase, 1 figure and 1 special character). If invalid a message needs to be displayed.
- the retype password needs to meet the same validation rule AND be the same as the password. If not the same, a message needs to be displayed.
- the register button may only be active when ALL rules are valid.
4.1. The RegistrationFormBloc
This BLoC is responsible for handling the validation business rules, as expressed here before.
Here is its source code:
Let me explain this in details...
- We first initialize 3 BehaviorSubject to handle the Streams of each TextField of the form.
- We expose 3 Function(String) which will be used to accept inputs from the TextFields.
- We expose 3 Stream<String> which will be used by the TextField to display an potential error message, resulting from their respective validation
- We expose 1 Stream<bool> which will be used by the ElevatedButton to enable/disable it based on the whole validation result.
Okay, it is now time to dive into deeper details...
As you may have noticed, the signature of this class is a bit special. Let's review it.
class RegistrationFormBloc extends Object
                           with EmailValidator, PasswordValidator
                           implements BlocBase {
  ...
}
The with keyword means that this class is using MIXINS ( = "a way of reusing some class code inside another class") and, to be able to use the with keyword, the class needs to extends the Object class. These mixins contain the code which validates the email and password, respectively.
For more details on Mixins I recommend you to read this great article from Romain Rastel.
4.1.1. Validator Mixins
I will only explain the EmailValidator since the PasswordValidator is very similar.
First, the code:
This class exposes a final function ("validateEmail") which is a StreamTransformer.
Reminder
A StreamTransformer is invoked as follows: stream.transform(StreamTransformer).
The StreamTransformer takes its input from the Stream that refers to it via the transform method. It then processes this input, and reinjects the transformed input into initial Stream.
In this code, the processing of the input consists in checking it against a regular expression. If the input matches the regular expression, we simply reinject the input into the stream, otherwise, we inject an error message into the stream.
4.1.2. Why using a stream.transform()?
As said here before, if the validation is successful, the StreamTransformer reinjects the input into the Stream. Why is it useful?
Here comes the explanation related to the Rx.combineLatest3()... This method will NOT emit any value until all Streams it refers to, have emitted at least one value.
Let's have a look at the following picture to illustrate what we want to achieve.
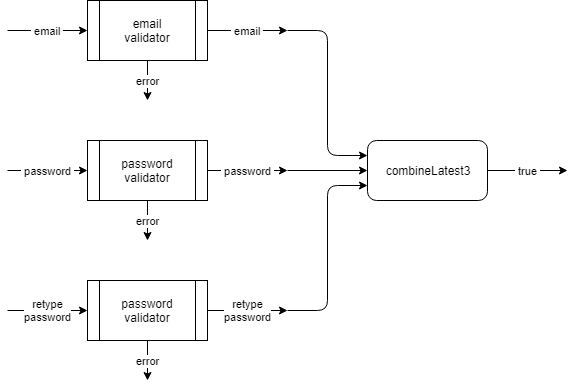
- if the user enters an email and the latter is validated, it will be emitted by the email stream which will be one input of the Rx.combineLatest3();
- if the email is not valid, an error will be added to the stream (and no value will go out the stream);
- the same applies to both password and retype password;
- when all these 3 validations will be successful (meaning that all these 3 streams will emit a value), the Rx.combineLatest3() will emit in turn a true thanks to the "(e, p, c) => true" (see line #35).
4.1.2. Validation of the 2 passwords
I saw many questions related to this comparison on Internet. Several solutions exist, let me explain 2 of them.
4.1.2.1. Basic solution - no error message
A first solution could be the following one:
This solution simply compares the 2 passwords as soon as they both have been validated and if they match, emits a value (= true).
As we will soon see, the Register button accessibility will depend on this registerValid stream.
If both passwords do not match, no value is emitted by that stream and the Register button remains inactive but the user will not receive any error message to help him understand why.
4.1.2.2. Solution with error message
Another solution consists in extending the processing of the confirmPassword stream as follows:
Once the retype password has been validated, it is emitted by the Stream and, using the doOnData, we can directly get this emitted value and compare it with the value of the password stream. If both do not match, we have now the possibility to send an error message.
4.2. The RegistrationForm
Let's now have a look at the RegistrationForm before explaining it:
Explanation:
- As the RegisterFormBloc is only meant to be used by this form, it is suitable to initialize it here.
- Each TextField are wrapped into a StreamBuilder<String> to be able to respond to any outcome of the validation process (see errorText: snapshot.error)
- Each time a modification is applied to the content of a TextField, we send the input to the BLoC for validation via the onChanged: _registrationFormBloc.onEmailChanged (case of email input)
- For the RegisterButton, the latter is also wrapped in a StreamBuilder<bool>.
- If a value is emitted by the _registrationFormBloc.registerValid, the onPressed method will do something
- If no value is emitted, the onPressed method will be assigned to null, which will deactivate the button.
That's it! No business rule is visible to the Form, which means that the rules could be changed without having to apply any modification to the form, which is excellent !
5. Part Of
Sometimes, it is interesting for a Widget to know whether it is part of a set to drive its behavior.
For this last use-case of this article, I will consider the following scenario:
- an application deals with items;
- a user could select items to put in his shopping basket;
- an item can be put in the shopping basket, only once;
- an item, present in the shopping basket, could be removed from the shopping basket;
- once removed, it is possible to put it back.
For this example, each item will display one button which will depend on the presence of the item in the shopping basket. If not part of the shopping basket, the button will allow the user to add it to the basket. If part of the shopping basket, the button will allow the user to remove it from the basket.
To better illustrate the "Part of" pattern, I will consider the following architecture:
- a Shopping Page will display the list of all possible items;
- each Item in the Shopping Page will display one button to add the item to the shopping basket or to remove it, depending on its presence in the basket;
- if an item in the Shopping Page is added to the basket, its button will automatically update to allow the user to remove it from the basket (and vice versa) without having to rebuild the Shopping Page
- another page, Shopping Basket, will list all items present in the basket;
- it will be possible to remove any item from the basket, from this page.
Side note
The name Part Of is a personal name I give. It is not an official name.
5.1. ShoppingBloc
As you can now imagine, we need to consider a BLoC dedicated to the handling of the list of all possible items, and the ones part of the Shopping Basket.
This BLoC could look like the following:
The only method which might require an explication is the _postActionOnBasket() method. Each time an item is added to or removed from the basket, we need to "refresh" the content of the _shoppingBasketController Stream so that all Widgets which are listening to changes to this Stream will be notified and be able to refresh/rebuild.
5.2. ShoppingPage
This page is very simple and only displays all the items.
Explanation:
- the AppBar displays a button that:
- displays the number of items, present in the basket
- redirects the user to the ShoppingBasket page when clicked
- the list of items is built using a GridView, wrapped in a StreamBuilder<List<ShoppingItem>>
- each item corresponds to a ShoppingItemWidget
5.3. ShoppingBasketPage
This page is very similar to the ShoppingPage except that the StreamBuilder is now listening to variations of the _shoppingBasket stream, exposed by the ShoppingBloc.
5.4. ShoppingItemWidget and ShoppingItemBloc
The Part Of pattern relies on the combination of these 2 elements:
- the ShoppingItemWidget is responsible for:
- displaying the item and
- the button to add or remove the item to/from the shopping basket
- the ShoppingItemBloc is responsible for telling the ShoppingItemWidget whether the latter is part or not of the shopping basket.
Let's see how they work together...
5.4.1. ShoppingItemBloc
The ShoppingItemBloc is instantiated by each ShoppingItemWidget, which gives it its "identity".
This BLoC listens to all variations of the ShoppingBasket stream and checks if the specific item identity is part of the basket.
If yes, it emits a boolean value (= true), which will be caught by the ShoppingItemWidget to know whether it is part of the basket or not.
Here is the code of the BLoC:
5.4.2. ShoppingItemWidget
This Widget is responsible for:
- creating an instance of the ShoppingItemBloc and passing its own identity to the BLoC
- listening to any variation of the ShoppingBasket content and transferring it to the BLoC
- listening to the ShoppingItemBloc to know whether it is part of the basket
- displaying the corresponding button (add/remove) depending on its presence in the basket
- responding to user action of the button
- when the user clicks the add button, to add itself to the basket
- when the user clicks the remove button, to remove itself from the basket.
Let's see how this works (explanation is given in the code).
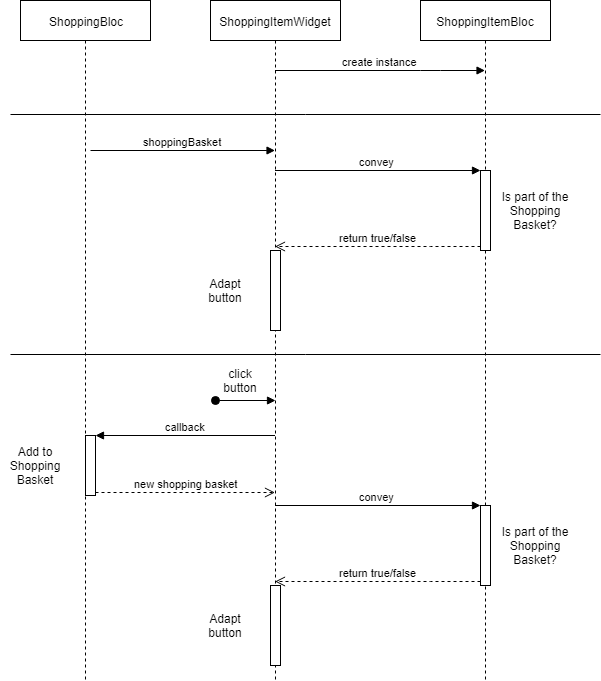
5.5. How does all this work?
The following diagram shows how all pieces work together.
Conclusions
Another long article I wish I could make a bit shorter but I think it deserved some explanations.
As I said in the introduction, I personally use these "patterns" very frequently in my developments. This makes me save a tremendous amount of time and effort; my code is more readable and easier to debug.
In addition, it helps separating the business from the view.
There are most certainly other ways of doing this and even better ways but it simply works for me and that's all I wanted to share with you.
Stay tuned for new articles and, meanwhile, I wish you a happy coding.