
Introduction
I wondered how difficult it could be to write a board game in Flutter, involving Animations, Sequences of Animations, Triggered Animations, Sounds, Gesture Recognition...?
As I have been playing for years with Math-3 games such as Candy Crush, Bejeweled and lately FishDom, it sounded natural to me to give a try and mimic these games.
After only 1 week, I already had a working version of a game I called "Flutter Crush" and this article explains the steps I followed for this proof of concept.
This is an animation that shows some parts of the game.

Source code
The full source code of this article is to be found on GitHub.
Please note that my objective was not a release the game. Therefore, there are still things which are not fully implemented or tested. Also, the structure of the code could be very much improved but this was not part of my objectives.
Also, if the source code might give you ideas to build your own game, I will be more than happy... simply let me know... :smiley:
1. Introduction to Match-3 games
Before starting talking about implementation, it might be interesting to (re-)explain how does a Match-3 game work. (If you already well know this topic, you may skip this explanation and directly jump to the Implementation Section).
A Match-3 game is a puzzle game which consists in aligning 3 to more similar tiles on a board to make them disappear or be transformed to another tile. Tiles which disappear make "hole(s)" in the board. By (usually) gravity, tiles which are above the holes will fall to fill in the gaps. At the end of a move, columns are refilled with new tiles.
A player may slide 1 tile of one cell at a time, horizontally or vertically. Both the "source" tile (the one which was moved by the user) and the "destination" tile (the tile at destination after the move) are swapped. If this results in creating a Chain, the move is considered as correct and played. Otherwise, the move is considered as being incorrect and both tiles are put back to their initial locations.
Rules depend on the game. In my case I only considered a subset of what currently exists. Here follows the rules I selected:
1.1. Types of alignments
The following image shows the different types of combinations.

1.2. Notion of Chains
A Chain is a series of at least 3 tiles of a same kind which are aligned vertically or horizontally:
- a chain of 3 tiles results in removing these 3 tiles;
- a chain of 4 tiles results in removing these 4 tiles but the tile which created the chain is replaced by another type (in my case a TNT);
- a chain of 5 (or more) tiles results in removing all the tiles of the chain but the tile which created the chain is replaced by another type (in my case a BOMB);
1.3. Notion of Combos
A Combo is resulting from the combination of 2 Chains having one tile in common. The sum of all tiles from both chains gives the type of combo.
- a "t" or "l" combo counts 6 tiles. All tiles of the chains are removed and the common tile is replaced by another type (in my case a "BOMB");
- a "L" combo counts 7 tiles. All tiles of the chains are removed and the common tile is replaced by another type (in my case a "WRAPPED");
- a "T" combo counts 8 tiles. All tiles of the chains are removed and the common tile is replaced by another type (in my case a "ROCKET");
1.4. Bombs or similar
When hit, a bomb explodes, removing all the tiles in the space impacted by the explosion. The number of tiles to be removed depends on the type of bomb:
- a "TNT" removes the tiles right next to the bomb;
- a "BOMB" removes the tiles up to 2 cells around the bomb;
- a "WRAPPED" removes the tiles up to 3 cells around the bomb;
- a "ROCKET" removes all the tiles
1.5. Other elements
Some other elements might be added to the game, such as:
- a "hole": a place where no tiles can go;
- a "wall": a place that cannot be moved nor removed from the game;
- a "ice": which covers a tile and forces the latter to be involved in at least 2 events before being removed;
- ...
1.6. Objectives
Each game level may have different objectives or a combination of several objectives, such as:
- removal a certain amount of a certain type of tiles;
- creation a certain amount of "bombs";
- ...
1.7. Limited amount of moves
In all circumstances, each game level allows a maximum amount of moves to achieve the objectives.
2. Preamble to Implementation
Before starting with the code, we need to have an idea of the different parts of the game and how they will interact with each other.
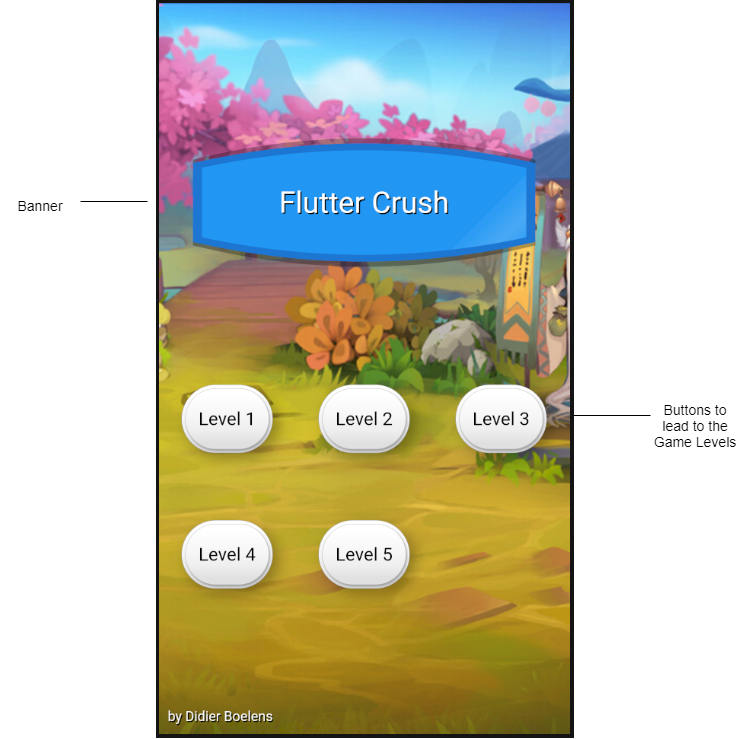
2.1. The Pages
This game only contains 2 pages.
2.1.1. Home Page
The Home Page is only meant to display a nice background, a title and a series of buttons, each of them launching the corresponding game level.
2.1.2. Game Page
The Game Page contains a series of elements as shown in the following image:
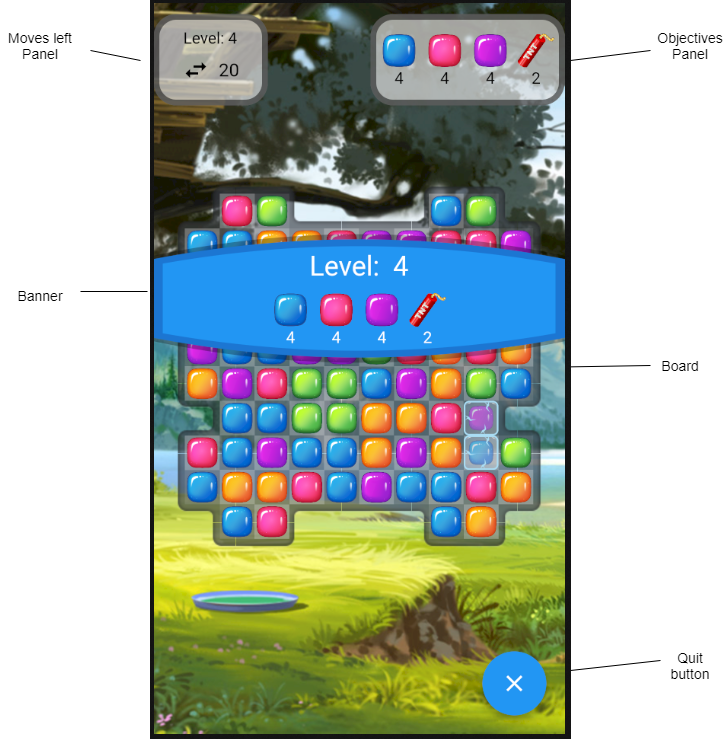
2.1.2.1. Splash Banner
At the game start, a Splash banner is displayed to show the user the information related to:
- the level number
- the list of objectives
When the game is over, a Splash banner is displayed to mention whether the player won and lost the game.
2.1.2.2. Moves panel
This panel is displayed in the top left corner of the screen. This panel shows the player how many moves are left before the game ends.
The number of moves left needs to be refreshed each time the player plays a move.
2.1.2.3. Objectives panel
This panel is displayed in different locations of the screen, depending on the device orientation:
- in portrait mode, I chosed to display it in the top right corner;
- in landscape mode, I chosed to display it in the bottom left corner.
The objective panel is made up of a series of "icons" (which represent a type of tile), and the corresponding objective counter.
Each objective counter needs to be refreshed each time the player plays a move that leads to decrement one objective counter.
2.1.2.4. Board panel
This panel displays the tiles, organized based on the level definition, with dimensions that depends on the device orientation and dimensions.
In other words, we need to determine the dimensions of a tile "square" based on the device dimensions and the position of the "board", on the device orientation.
2.1.3. Interaction between parts
Each time the player does a move:
- the "moves panel" needs to be updated (number of moves left needs to be decremented);
- the move needs to be evaluated to check if a combo or chain is created, then resolved;
- the "board" needs to be updated (if applicable);
- the "objectives panel" needs to be updated (based on tiles which have been removed);
- the "game status" needs to be updated.
2.1.4. Definition of the levels
Each level needs to be defined in terms of:
- board definition
- dimensions (number of rows and columns)
- board cells which accept tiles;
- pre-defined board cells (walls, forbidden/holes...);
- objectives
- number of moves
These level definitions will stored in an external asset in JSON format.
2.2. BLoC Architecture
From the requirements defined here above, we may derive that many parts of the game will have to interact with each other.
This is a perfect example where the notion of Streams could help:
- when a tile is removed from the board, we send a notification to the BLoC:
- the BLoC dispatches this information to the Objectives;
- when all Objectives are met, an event is emitted to notify about the fact that the game is won.
- when a move is played, we send a notification to the BLoC:
- the BLoC dispatches this information to the Moves Counter;
- when there is no moves left, an event is emitted to notify about the fact that the game is over.

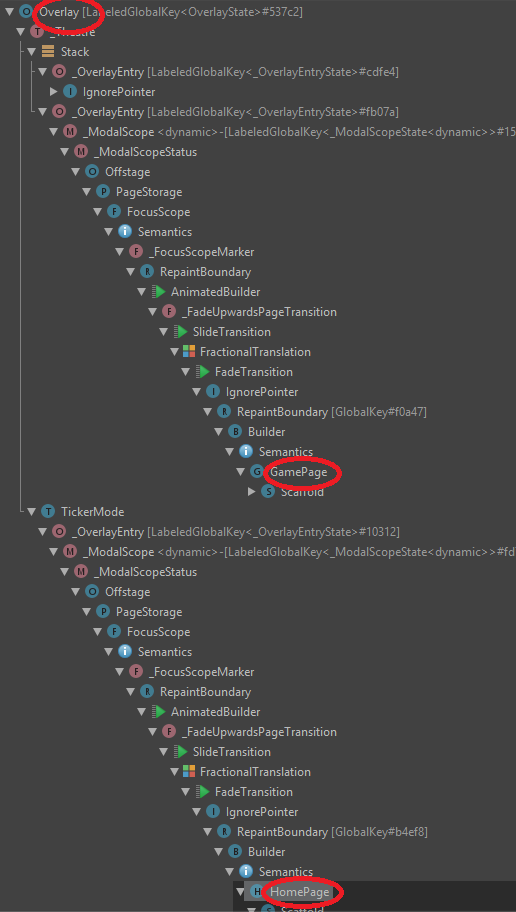
As we can see from this picture, the BLoC needs to interact with both pages, it is therefore necessary to position the BLoC as an ancestor of both pages.
In Flutter, the ancestor of all pages must itself be the parent of the MaterialApp. This is due to the fact that a page (or Route) is wrapped in by OverlayEntry, child of a common Stack for all pages.
In other words, each page has a Context which is independent of any other page. This explains why, without using any tricks, it is impossible for 2 pages (Routes) to have anything in common.
2.2.1. GameBloc
The 'GameBloc' might be considered as a kind of "Application State" but is also used:
- as an events dispatcher (use of Streams);
- to memorize the list of all levels;
- to launch a new game level;
- to reset a game level.
2.2.2. Side notes
A solution based on a Global Singleton Class would have been much easier to implement and would have worked just fine however, let's play the game and try to stick to the architecture best practices.
BLoC best practices say that all communications to/from the BLoC must be done via Streams... For this proof of concept, as I knew this code was not intended to be used anywhere else, for sake of clarity, I opted not to stick to this paradigm and use methods to request an action from the BLoC.
In order to expose the main BLoC (=GameBloc), I used the Provider Package from Rémi Rousselet. This package is a generic version of my BlocProvider which I defined in a previous article.
3. Algorithms
This section describes the algorithms.
3.1. Start of a Game
The following diagram shows the sequence of actions when a user launches a new level.
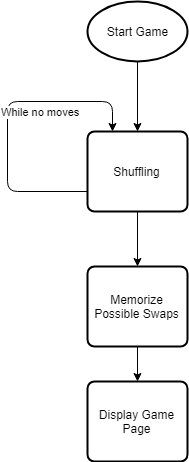
3.1.1. Tiles Shuffling
During this step, it is very important to shuffle the tiles so that no direct Chain is created.
To achieve this:
- we fill the grid from row = 0..max rows -1 and col = 0..max cols -1;
- for each cell, we get a random tile type that we compare with the previous 2 cells left [row][col-1] & [row][col-2] as well as with the 2 cells down [row-1][col] & [row-2][col];
- if the random tile type is the same as for any of these other cells, we loop until there is no matching.
3.1.2. Definition of the Swaps
To identify all the possible Tile Swaps, we need to iterate through all Tiles and, for each of them:
- loop through each possible move (up, left, down, right)
- simulate the move (meaning exchanging the cells)
- check if this generates an horizontal or/and vertical chains
3.2. Play a move
The following diagram shows the sequence of actions when a user plays a move.
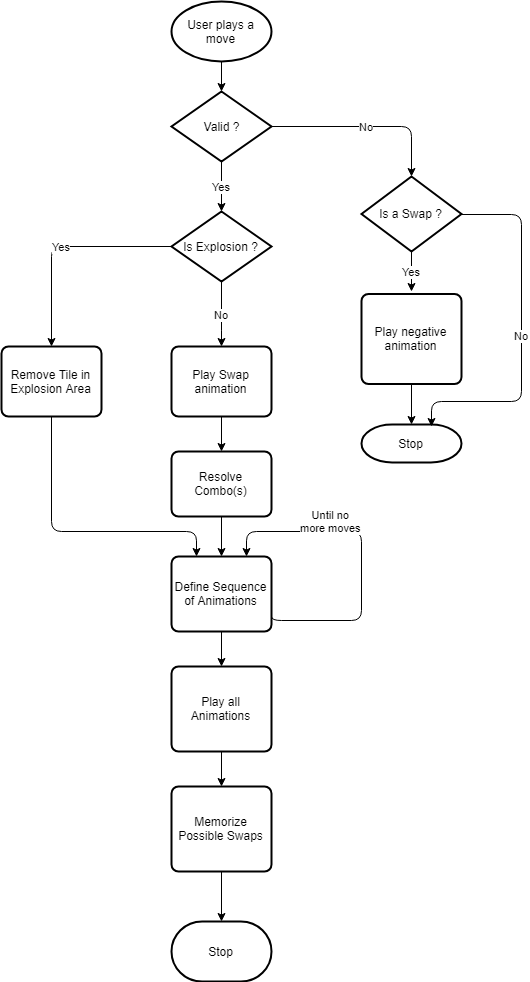
3.2.1. Negative Swap Animation
This animation consists in showing an animation that exchanges 2 tiles, then to revert the swap.
3.2.2. Swap Animation
This animation consists in showing an animation that exchanges 2 tiles.
3.2.3. Definition of the Sequence of Animations
Forewords
In order to show the tiles that fall in order to fill in the empty cells, my first attempt was to animate each tile, one row down at a time. The outcome was not smooth at all and the animation was jerky.
I finally came to the solution were I calculate all the moves that each specific tile is going to do and calculate the delays between each successive animation in the sequence.
Delays are calculated globally for the whole set of tiles. Let me explain...
- delay = 0
- longest delay = 0
- Loop until there is no more moves
- delay = longest delay
- resolve combos => new delay
- for each column (0.. cols-1)
- process the avalanche with delay
- process vertical fall with delay => new delay
- calculate longest delay
3.2.3.1. Tiles that fall vertically

Explanation:
- 'A' will fall from row #3 to row #1 (= destination). As there is no tile in row #2, it will start directly (delay = 0);
- 'B' will fall from row #4 to row #2 (= destination). As there is a tile in row #3 (=A), it will start after a delay (delay = 1);
- 'C' will fall from row #7 to row #3 (= destination). As there is no tile in row #6, it will start directly (delay = 1).
3.2.3.2. Fill empty cells with new tiles
After we calculated the moves of each cell of a column, if there are cells which are empty (at the top), we need to inject new tiles.
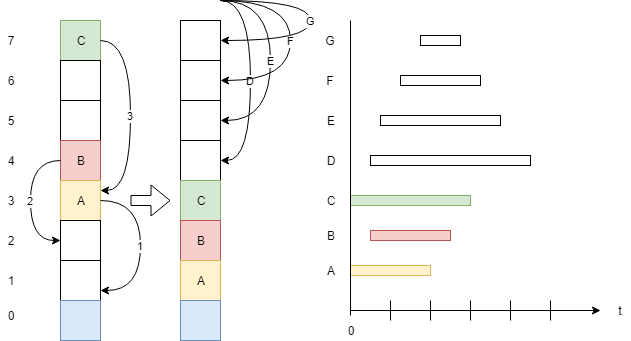
Explanation:
- New tile 'D' will fall from row #7 to row #4, after a delay of 1
- New tile 'E' will fall from row #7 to row #5, after a delay of 2
- New tile 'F' will fall from row #7 to row #6, after a delay of 3
- New tile 'G' will fall from row #7 to row #7, after a delay of 4
As you may have noticed, tile 'G' will move from row #7 to row #7. This is perfectly possible since the animation related to injection of a new tile will start with a vertical translation so simulate its insertion.
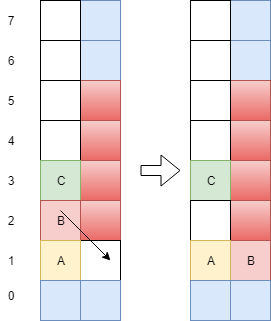
3.2.3.3. Notion of Avalanche
There are cases where empty cells could not be filled by tiles falling vertically. This might be due to an obstacle such as a wall, for example.
In that case, we need for each tile that falls, to check whether there is an empty cell in the previous (or next) column, in row = destination -1 (or even below). In this case, we move the tile to that new destination with a delay + 1.
4. Technical Implementation
Now that we know the rules, the requirements, the algorithms, it is now time to talk about the technical implementation...
As regard the explanation, I am not going to explain any single line of code but will mainly focus on the interesting parts of the implementation. Please refer to the source code, which is fully documented, for any further details.
4.1. The assets
Tile icons and levels definition are all assets that are going to be used by the game. All these assets are stored in the '/assets' folder and must be referenced in the 'pubspec.yaml' file.
4.2. 2-dimension array in Dart
The whole game is based on a 2-dimension grid and Dart does not offer any Array2d API. I used one I found on Internet to which I applied some changes. Please have a look at the file helpers/array_2d.dart to see how it is implemented.
Now with this new API, it is easy to define a 2-dimension array for the game and directly access a specific cell of the grid, as follows:
Array2d<Tile> grid = Array2d<Tile>(numberOfRows, numberOfColumns);
grid[row][col] = Tile(...);
4.3. Definition of the levels
As explained earlier, I externalized the definition of the different levels in a file called "/assets/levels.json".
The file structure is the following:
{
  "levels": [
      {
          "level": 1,                                 // level number
          "rows": 10,                                 // number of rows
          "cols": 10,                                 // number of columns
          "grid": [                                   // template for the grid
              "X,1,1,X,X,X,X,X,1,X",                  // upper row (row = 9)
              ...
              "X,1,1,W,1,1,W,1,2,X",                  // row #x
              ...
              "X,1,1,X,X,X,X,1,1,X"                   // lower row (row = 0)
          ],
          "moves": 24,                                // maximum number of moves
          "objective": ["4;blue","20;red","2;bomb"]   // Objectives
      },
      ...
  ]
}
At initialization of the GameBloc, this file is read and all level definitions are memorized.
4.4. Start of a Level
When the user launches a level, a new instance of the GameController is created, which results in generating an internal grid of Tiles, based on the selected level grid template. Once this is done, the GamePage is instantiated.
4.5. Display of the Tiles
Tiles are displayed in a grid, centered on the screen. This grid does not fill the entire width. Some padding is used to make the look at bit nicer.
4.5.1. Difficulty related to the device
As devices have different resolutions, the best way to collect reliable information about the exact position of the centered grid and dimensions of one of its cells, is to retrieve it once the grid has been rendered.
The 'Board' widget is responsible for displaying the grid and retrieving the exact position of its top-left corner, as well as the dimensions of one of its cells.
As it is not possible to get this information at the level of the build(...) method (since not yet rendered), we need to use a trick.
The trick consists in asking Flutter to call a method as soon as the rendering is complete, the following way:
Widget build(BuildContext context){
  ...
  WidgetsBinding.instance.addPostFrameCallback((_) => _afterBuild());
  ...
}
The addPostFrameCallback method requests a callback to be invoked when the main rendering pipeline has been flushed. It is then possible to obtain the information we need but... how?
Here comes a second trick which consists in "naming" the grid and one of its cells.
To give a name to a Widget, we use the notion of Key. A key can be obtained in different ways but the easiest one is to use the GlobalKey API which returns a unique identifier across the entire application. To assign the key to a Widget, use the key property as follows:
GlobalKey _myWidgetKey = GlobalKey();

...
Widget build(BuildContext context){
    return MyWidget(
        key: _myWidgetKey,
        ...
    );
)
It is now possible to retrieve the dimensions and position of any widget, once we know its key and once it has been rendered. The following code extract shows a way of doing it:
void _afterBuild(){
  if (_myWidgetKey.currentContext != null){
      final RenderBox box = _myWidgetKey.currentContext.findRenderObject() as RenderBox;
      final Offset topLeft = box.size.topLeft(box.localToGlobal(Offset.zero));
      final Offset bottomRight = box.size.bottomRight(box.localToGlobal(Offset.zero));
      final Rect widgetDimensions = Rect.fromLTRB(topLeft.dx, topLeft.dy,
                                              bottomRight.dx, bottomRight.dy);

      ...
  }
}
Please have a look at the "Board" Widget for further details on its implementation.
4.5.2. How to exactly position the tiles in the grid?
An extra complexity resides in the exact positioning of the Tiles in the grid as the grid position and its cells dimensions are not known before the rendering. Also, because of the animations (see later), I need the tiles to have an absolute position and not a relative one (in other words, each tile will have to be positioned in relation to the upper left corner of the screen). This means that it is not possible to display them before the grid position and its cells dimensions have been retrieved.
Here comes the first use of the Streams...
Once the Board Widget will have retrieved the information related to the grid position and cells dimensions, this data will be saved in the Level object and a value 'true' will be input into the _readyToDisplayTilesController of the GameBloc via its Sink.
In the GamePage, a StreamBuilder is listening to the GameBloc.outReadyToDisplayTiles Stream. Once the boolean value is emitted by that Stream, the StreamBuilder will be awoken and will display the Tiles (see methods '_buildTiles()' in GamePage and '_afterBuild()' in Board Widget)
Widget _buildTiles() {
  return StreamBuilder<bool>(
    stream: gameBloc.outReadyToDisplayTiles,
    initialData: null,
    builder: (BuildContext context, AsyncSnapshot<bool> snapshot) {
        if (snapshot.data != null && snapshot.hasData) {
            final List<Widget> tiles = <Widget>[];
            ...

            return Stack(
                children: tiles,
            );
        }
        // If nothing is ready, simply return an empty container
        return Container();
    },
  );
}
Interesting note
In Dart, objects are passed by reference.
In other words, if you pass an object to a method, any update applied to the object inside the method, will be visible outside the method too !
I used this feature. The Board Widget saves the position of the grid and dimensions of its cells in the instance of the level object, which is passed in argument to the Board Widget.
As you will see in the code, the level object is broadly used to convey information about the level definition to the GameController, Tiles, ... Therefore, it is maybe not conventional (or a best practice) but it is a very convenient way to propagate the information about the grid and its cells, too.
4.6. Gesture detection
To play a move, the user needs to touch the screen on a Tile and move this Tile horizontally or vertically.
4.6.1. Capture of the Gesture
To capture the gesture, we need to wrap the board with a GestureDetector Widget, as follows:
...
GestureDetector(
    onPanDown: (DragDownDetails details) => _onPanDown(details),
    onPanStart: _onPanStart,
    onPanEnd: _onPanEnd,
    onPanUpdate:(DragUpdateDetails details) => _onPanUpdate(details),
    onTap: _onTap,
    onTapUp: _onPanEnd,
    child: Stack(
        children: <Widget>[
            _buildMovesLeftPanel(orientation),
            _buildObjectivePanel(orientation),
            _buildBoard(),
            _buildTiles(),
        ],
    ),
),
...
Explanation:
onPanDown
Is called as soon as the user touches the screen. DragDownDetails gives the position on the screen.
onPanStart
Is called as soon as the user starts moving the finger on the screen.
onPanEnd
Is called as soon as the user removes the finger from the screen.
onPanUpdate
Is called once the move has started, each time the finger moves on the screen.
onTap
Is called when the user simply taps on the screen.
onTapUp
Is also called when the user removes the finger from the screen.
4.6.2. Determination of the Tile being played
At first, we need to check if the user touches a Tile on the screen. This is achieve through the onPanDown callback.
This method:
- converts the position of the touch event into a (row, col) correspondance, using the position of the grid as reference;
- validates that this corresponds to an acceptable (row, col);
- checks whether the corresponding Tile can be moved.
If all these conditions are met, we record the Tile that is touched.
4.6.3. Determination of the Direction of the move
In the context of this game, the only thing that matters is to determine the direction of the move (horizontally: left or right, vertically: up or down).
This is achieved through 2 callbacks:
onPanStart
This indicates that the finger has started to move. When this callback is invoked, we memorize the starting position on the screen.
onPanUpdate
Each time that the finger moves, after onPanStart has been called, this callback is invoked with the new position of the finger.
We simply need to calculate the movement delta, take the biggest difference between horizontal and vertical positions, and calculate the resulting (row, col) correspondance, which gives us the destination Tile.
Follows the validation of the movement and the processing of the movement itself if applicable.
4.7. Notion of Animation, triggered by the code.
Most of the cases, Animation means use of an AnimationController, which when the latter is running, is listening to tick events and triggers a build of a Widget.
In our case, this would mean having to rebuild the GamePage (or part of it, if we optimize), which would not be a big issue but... how to define the animations to be played, which Tile(s) to animate and how? This would become a nightmare.
The solution I came with is based on the use of the Overlay (please refer to my previous articles on the Overlay for further details on this topic).
4.7.1. Advantage of using the Overlay
The Overlay is a Stack which already contains both HomePage and GamePage, as explained before. Nothing prevents us from adding any new Widget to it, in a temporarilly manner.
This Widget will be:
- by default, put on top of any other content of the Overlay;
- be built as soon as added to the Overlay.
This is it, we found a way of playing an animation, triggered by the code, by simply adding a Widget, only responsible for the animation, to the Overlay.
4.7.2. How to do it?
The following code shows how this can be achieved:
//
// Instantiation of an OverlayEntry which will contain
// our animation reponsible Widget
//
OverlayEntry _overlayEntry = OverlayEntry(
    builder: (BuildContext context){
        return MyAnimationResponsibleWidget(
            ...
        );
    },
);

//
// Add the OverlayEntry to the Overlay
//
Overlay.of(context).insert(_overlayEntry);
4.7.3. How to know when an animation completes?
In our game, we need to know when an animation completes.
To be notified, let's simply add a callback method which will be invoked by the animation-responsible Widget, once the animation is complete.
The generic code skeleton of such animation-responsible Widget would then become the following:
class MyAnimationResponsibleWidget extends StatefulWidget {
MyAnimationResponsibleWidget({
super.key,
required this.onComplete,
});
final VoidCallback onComplete;
_MyAnimationResponsibleWidgetState createState() => _MyAnimationResponsibleWidgetState();
}
class _MyAnimationResponsibleWidgetState extends State<_MyAnimationResponsibleWidgetState>
with SingleTickerProviderStateMixin {
late AnimationController _controller;
void initState(){
_controller = AnimationController(vsync: this,
duration: ...,)
..addListener((){
setState((){});
})
..addStatusListener((AnimationStatus status){
if (status == AnimationStatus.completed){
if (widget.onComplete != null){
widget.onComplete();
}
}
})
..forward();
}
void dispose(){
_controller.dispose();
super.dispose();
}
Widget build(BuildContext context){
...
}
}
One additional advantages of being notified that an animation is complete is that we may remove the OverlayEntry from the Overlay at the right moment, as follows:
//
// Instantiation of an OverlayEntry which will contain
// our animation reponsible Widget
//
OverlayEntry? _overlayEntry;

_overlayEntry = OverlayEntry(
    builder: (BuildContext context){
        return MyAnimationResponsibleWidget(
            ...
            onComplete: (){
                _overlayEntry?.remove();
                _overlayEntry = null;
            }
        );
    },
);

//
// Add the OverlayEntry to the Overlay
//
Overlay.of(context).insert(_overlayEntry!);
4.7.4. Notion of Future
Something also very interesting for our game is the notion of Synchronization.
Most of the time, the game will have to await the completion of one (or several) animation(s) before going on with sub-sequent processing.
Should we only rely on the callback method to be invoked, this would made our code quite cumbersome and very difficult to handle, in case of multiple animations. Therefore, we need to find out a way of awaiting the completion of all animations.
Here comes the notion of Future into play.
4.7.4.1. How to make a Future out of a synchronous source code?
Fortunately for us, Dart comes with a solution, called Completer, which produces a Future object and completes it later.
The following code shows how to implement this Completer in a method which will trigger an animation:
Future<dynamic> _playAnimation() async {
  Completer completer = Completer();

  OverlayEntry? overlayEntry;

  overlayEntry = OverlayEntry(
      builder: (BuildContext context){
          return MyAnimationResponsibleWidget(
              onComplete: (){
                  overlayEntry?.remove();
                  overlayEntry = null;

                  // Completes the Future
                  completer.complete(null);
              },
          );
      },
  );
  Overlay.of(context).insert(overlayEntry!);

  // Return the Future to the caller
  return completer.future;
}
4.7.4.2. How to use this Future?
The following code sample shows how to wait for one or multiple animations to complete:
// Wait for 1 animation to complete
  await _playAnimation();

  // Wait for several animations to complete
  await Future.wait([_playAnimation(), _playAnimation()]);
4.8. How to use the Streams?
We now have almost all the pieces to build the game but I would like to come back on the notion of Streams and the way of using them to display the:
- number of moves left before the end of the game;
- counter related to each objective;
- banner when the game is over.
4.8.1. Number of moves left
This is done by the 'StreamMovesLeftCounter' Widget. Its implementation is very basic:
class StreamMovesLeftCounter extends StatelessWidget {
Widget build(BuildContext context) {
GameBloc gameBloc = Provider.of<GameBloc>(context, listen: false);
return Row(
mainAxisSize: MainAxisSize.min,
mainAxisAlignment: MainAxisAlignment.center,
children: <Widget>[
const Icon(Icons.swap_horiz, color: Colors.black,),
SizedBox(width: 8.0),
StreamBuilder<int>(
initialData: gameBloc.gameController.level.maxMoves,
stream: gameBloc.movesLeftCount,
builder: (BuildContext context, AsyncSnapshot<int> snapshot){
return Text('${snapshot.data}', style: TextStyle(color: Colors.black, fontSize: 16.0,),);
}
),
],
);
}
}
We use a simple StreamBuilder which listens to the "movesLeftCount" stream, exposed by the GameBloc.
Nothing difficult. When the number of moves left is added to the "GameBloc.movesLeftCount" Sink, the value is emitted by the stream and intercepted by the StreamBuilder, which rebuilds the Text.
4.8.2. Objective Counters
To display and refresh the objective counters, it is a bit more tricky, since I only wanted to rebuild the counter of ONE PARTICULAR objective, and not all.
Since the display of an objective is done by one dedicated Widget and a game might have several objectives, I needed to find a way to let the Widget know that it needs to refresh itself or not...
As you will see in the code, each time we are removing a Tile or making a bomb explode, we emit an ObjectiveEvent which contains the:
- type of Tile being involved;
- the counter related to that particular Objective (if any)
This ObjectiveEvent is emitted by the GameBloc, via the sendObjectiveEvent Sink / outObjectiveEvents Stream.
4.8.2.1. The Objective BLoC
The solution I implemented resides on the use of a second BLoC, dedicated to the Objectives.
This BLoC is written as follows:
class ObjectiveBloc {
///
/// A stream only meant to return whether THIS objective type is part of the Objective events
///
final BehaviorSubject<int> _objectiveCounterController = BehaviorSubject<int>();
Stream<int> get objectiveCounter => _objectiveCounterController.stream;
///
/// Stream of all the Objective events
///
final StreamController<ObjectiveEvent> _objectivesController = StreamController<ObjectiveEvent>();
Function get sendObjectives => _objectivesController.sink.add;
///
/// Constructor
///
ObjectiveBloc(TileType tileType){
//
// We are listening to all Objective events
//
_objectivesController.stream
// but, we only consider the ones that matches THIS one
.where((e) => e.type == tileType)
// if any, we emit the corresponding counter
.listen((event) => _objectiveCounterController.add(event.remaining));
}
void dispose() {
_objectivesController.close();
_objectiveCounterController.close();
}
}
Explanation:
The BLoC consists in the interaction of 2 Streams:
the _objectivesController will be fed with all the ObjectiveEvent
- each time an ObjectiveEvent is emitted, it is compared to the type of Tile of interest;
- if the ObjectiveEvent corresponds to the type of Tile, the counter is input into the "_objectiveCounterController".
the _objectiveCounterController is responsible for conveying the counter that will be used by the StreamObjectiveItem Widget to update the counter on the screen.
In order to have this working, we need the StreamObjectiveItem to tell the type of Tile it is interested in being notified about any changes to the counter...
4.8.2.2. The StreamObjectiveItem Widget
This Widget is responsible for displaying the counter related to a specific Objective, identified by its type of Tile.
Here are the interesting parts of that widget, worth an explanation:
class StreamObjectiveItem extends StatefulWidget {
StreamObjectiveItem({
super.key,
required this.objective,
});
final Objective objective;
...
}
class StreamObjectiveItemState extends State<StreamObjectiveItem> {
late ObjectiveBloc _bloc;
late GameBloc gameBloc;
StreamSubscription? _subscription;
void didChangeDependencies(){
super.didChangeDependencies();
// Now that the context is available, retrieve the gameBloc
gameBloc = Provider.of<GameBloc>(context, listen: false);
_createBloc();
}
...
void _createBloc() {
_bloc = ObjectiveBloc(widget.objective.type);
// Simple pipe from the stream that lists all the ObjectiveEvents into
// the BLoC that processes THIS particular Objective type
_subscription = gameBloc.outObjectiveEvents.listen(_bloc.sendObjectives);
}
...
Widget build(BuildContext context) {
...
return Container(
...
StreamBuilder<int>(
initialData: widget.objective.count,
stream: _bloc.objectiveCounter,
builder: (BuildContext context, AsyncSnapshot<int> snapshot){
return Text(
'${snapshot.data}',
...
}
}
Explanation:
- When we are instantiating the Widget, we need to pass the type of Objective it will have to handle;
- As soon as the context is available, we:
- retrieve the instance of the gameBloc and,
- create a new instance of the ObjectiveBloc, initializing it with the objective tile type;
- Then we create a pipe:
- we are listening to any emission of any ObjectiveEvent and,
- simply relaying it into our dedicated instance of the ObjectiveBloc.
- As explained earlier, the dedicated instance of the ObjectiveBloc will only feed its _objectivesController when the type of the objective will match the type handled by this specific Widget.
- A StreamBuilder is listening to any emitted value to rebuild the counter Text.
4.8.3. The Game Over banner
This is much simpler to implement...
In the GamePage, as soon as the context is available, we instantiate a StreamSubscription which will listen to the GameBloC.gameIsOver Stream.
As soon as a value is emitted by that Stream, the GamePage will call the _onGameOver(bool) method which will launch the animation to display the banner, as show in the following code extract:
void didChangeDependencies(){
super.didChangeDependencies();
// Now that the context is available, retrieve the gameBloc
gameBloc = Provider.of<GameBloc>(context, listen: false);
// Reset the objectives
gameBloc.reset();
// Listen to "game over" notification
_gameOverSubscription = gameBloc.gameIsOver.listen(_onGameOver);
}
Next steps
As I mentioned in the introduction, the game works but this development was only a proof of concept as I wanted to experiment some areas.
Parts of the game have not been implemented such as:
- rocket explosion;
- avalanche from tiles that do not move;
- ice resolution;
- explosion of a bomb when the player moves it;
- combination of bombs;
- synchronization of sounds, when part of a sequence of actions.
Parts need additional testing, such as:
- chains of more that 5 tiles;
- chains after multiple sequences of animations.
I could have done all this but my intention is not to release the game. Therefore, feel free to consider all this as a personal exercise, if you wish...
Credits
Some icons such as tnt, rocket, mine and wall come from https://pngtree.com/.
Sounds come from https://freesound.org/.
Background images come from https://www.freepik.com.
Colored tile icons are under license (I bought it). So please do not reuse them.
Conclusions
There is still so much I could say about this code but I think that this article is already long enough.
I encourage you to have a look at the code, which I tried to document as much as possible. Even if the code is far from being perfect, it contains I think some nice features.
Most of the time I spent on this proof of concept (~70%) was on the algorithms part and not on the visuals. Flutter has really been well thought. Hot reload helped me to fine tune the look, algorithms... without having to systematically restart from the HomePage. It was a huge gain of time.
Animations are smooth, even using the emulators when multiple animations need to be played in parallel.
The notion of Overlay is fantastic and opens the door to wonderful things.
I really enjoyed working on this proof of concept and I wanted to share some findings and tricks with you.
I hope you found this article interesting.
Stay tuned for coming articles and, as usual, happy coding.